


Wireless
How to connect your laptop to the IonaWifi network
An Iona University network user ID and password are required to connect to the IonaWifi network. This is the same login information used on the Single Sign-On page at myiona.iona.edu.
View the appropriate instructions to connect your device to Iona’s wireless network below.
If you have any questions please contact the Ryan Library Help Desk at (914) 633-2635.No software installation is required; it’s just a few easy steps.
- Click the wireless icon near the top right corner of the screen on your MacBook.
- Click "IonaWifi" on the list of networks.
- Enter your Iona username and password and click to proceed. No other settings need to be changed.
- You may need to click "Continue" and/or enter your computer password or use Touch ID.
- Your device should connect to IonaWifi and you should have internet access immediately.
Connect to Iona's Wireless Network
- From the desktop, right-click the wireless icon >> Open Network & Internet settings. (On previous versions of Windows 10, it may say Open Network and Sharing Center.)
- Navigate to Network and Sharing Center
- In the Network and Sharing Center, choose “Setup a new connection or network”.
- Select “Manually connect to a wireless network”, then Next.
- After entering the following information, click Next.
Network name: IonaWifi
Security type: WPA2-Enterprise
Encryption type: AES (this is default)
Security Key: stays blank
Tick box to Start this connection automatically - Click “Change connection Settings”
- Check/uncheck the following, then click the Security tab:
Tick the box to Connect automatically when this network is in range
Untick the box to Look for other wireless networks while connected to this network
Untick the box to Connect even if the network is not broadcasting its name (SSID) - Choose the network authentication method, Microsoft: Protected EAP (PEAP), then click Settings.
- Uncheck “Verify the server's identity by validating the certificate”, then choose Configure.
- Uncheck the box “Automatically use my Windows logon name and password (and domain if any)”. Click OK.
- Choose OK to exit the Protected EAP Properties box.
- Click the “Advanced Settings” button under the Security tab.
- Check the box “Specify authentication mode” and choose User authentication. Click OK to close the window.
- Click on the notification, if present, or left-click on the wireless symbol in your taskbar (lower right-hand corner) to bring up available wireless networks. IonaWifi should say Action Needed. Click Connect.
- Enter your Iona username and password. This is the same as your username and password for the myiona.iona.edu Single Sign-On site.
- You will be connected to the IonaWifi network with a Connected, secured status.
Updating Antivirus Definitions
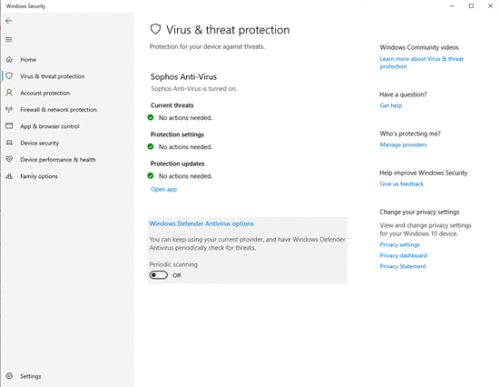
If possible, before the installation of ClearPass, you should check to ensure that Microsoft (Windows) Defender is up to date. If you have alternate antivirus software installed, please make sure that Periodic Scanning is turned on:
- Click on the shield icon in the bottom right corner, near the date/time
- Click on Windows Defender Antivirus options. Turn Periodic Scanning On.
Open the Windows Defender Security Center by clicking the shield icon in the taskbar or searching the start menu for Defender.
- Click the Virus & threat protection tile (or the shield icon on the left menu bar).
- Click Protection updates.
- Click Check for updates to download new protection updates (if there are any).
- Run a Quick Scan to ensure that your protection is up-to-date.
To Download ClearPass:
- From Iona University's campus, open a web browser and go to wireless.iona.edu
- Select Windows 10.
- Click the link to download ClearPass.
- If you are shown any warning pages, proceed anyway. The software is safe. Follow remaining prompts to complete download.
ClearPass OnGuard Status
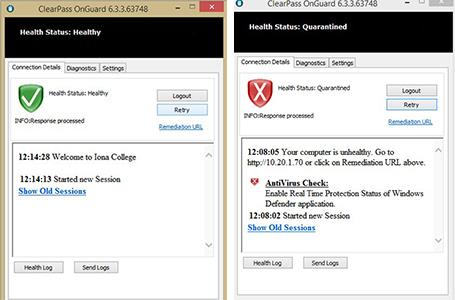
- Healthy Status: Your computer meets the requirements to access Iona’s wireless.
- Quarantined: Your computer can’t connect to Iona’s wireless until you fix the error listed. This happens when your computer has no supported anti-virus, the anti-virus is turned off or the virus definitions are older than 14 days. You can fix this by visiting the remediation URL link in ClearPass or by visiting wireless.iona.edu.
If you still have an “unhealthy” or “quarantined” status after updating your anti-virus program, you may need to remove it in order to get online on the IonaWifi network. Please remove your existing anti-virus and allow Windows to turn on Microsoft (Windows) Defender, included in Windows 10, to protect your computer.
Connect to Iona's Wireless Network
- Click the wireless icon in the system tray.
- Click the > to “Manage Wi-Fi connections.”
- Click IonaWifi on the list of networks, then click “Connect.”
- Enter your Iona username and password.
- Click “Connect” again at the prompt.
- A web page should open in your default browser, otherwise please open a browser and you should be redirected or prompted to the download page.
- Click “Click Here” to download the ClearPass OnGuard installer.
- Save and open the file to install ClearPass. This program is necessary to connect to the network and will check your computer to make sure it is up to date and has an active appropriate anti-virus application (such as Windows Defender).
- Follow the prompts to complete the installation.
- When ClearPass is done installing, give it a few moments to check for updates and update itself if necessary. When done, your computer will be checked and allowed to access the network. You may see a “Welcome to Iona University” notification from ClearPass and your network tray icon may change. Please test to ensure that you can get online successfully.
Connecting your iPhone or iPad to IonaWifi
- Open the "Settings" app on your device
- Tap "Wi-Fi"
- We recommend tapping the
 icon and choosing “Forget This Network” for any other Iona networks currently remembered by your phone
 - Tap “IonaWifi”
- Enter your Iona username and password
- Tap “Join”
- Tap “Trust” when prompted
- After a short delay, you should see a checkmark next to “IonaWifi”