


Zoom: Faculty
Are you ready to use Zoom? Here are some helpful resources for getting started!
Zoom Mobile App
You can download the Zoom mobile app for your iOS or Android device from the Apple App Store or the Google Play Store. You do not need to have a Zoom account to join a meeting from the mobile app.
Below are tutorials on Zoom's website
- How to Join a Zoom Meeting
- How to Change Your Zoom Background Image
(Note, you can download ready-to-use background images of Iona University here.) - Test Your Video
- Test Your Audio
Zoom is a cloud-based video conferencing tool that combines the ability to virtually meet across platforms and devices with the opportunity for meeting hosts (instructors) to collaborate with participants (students) through application and desktop sharing, high definition audio and video transmission, and web-based chat. For more information, please visit zoom.us.
Any faculty member who plans to record a lecture or provide a virtual classroom environment can use Zoom.
- Navigate to the Iona University Apps basket application on your desktop on the podium computer.
- Navigate to Zoom within the Apps basket, double-click to open and select Launch.
- Once Zoom is open, you will be asked to sign in to begin a meeting.
- Once you successfully sign into your Zoom meeting, you will see a menu. Choose the option to Start with Video.
- Once you enter your Zoom meeting, test your mic and speakers and then click on the green button to Join Audio.
Once you have successfully created a new meeting with video and audio, you can invite your participants.
- Click on the Invite option in the toolbar at the bottom of your Zoom meeting application window.
- Select the option to Copy URL, which you will paste into your Blackboard course or into an email message for your students.
- Create a link in your Blackboard course or in an email message to your students and paste the URL to the meeting.
- Navigate to the Zoom application in your Start folder (Windows) or Finder Applications on your Mac or double-click on the shortcut to the application located on your desktop.
- Once Zoom is open, you will be asked to sign in to begin a meeting.
- Once you successfully sign into your Zoom meeting, you will see a menu. Choose the option to Schedule.
- After you click Schedule, you will see a pop up window that enables you to enter settings for the scheduled meeting. Enter your start date and time of the meeting and how long you expect the meeting to last under the When section.
- Select whether you would like video to be on/off for both you (the host) and/or your participants under the Video (when joining a meeting) section.
- Under Meeting Options, select whether you want to require a meeting password, whether you want to allow participants to enter the meeting prior to your arrival and if you want to require the use of a Personal Meeting ID.
- Under Calendar, you can select whether you'd like to have this meeting synched up to your calendar. NOTE: Blackboard users should choose Other Calendars to avoid synching the meeting and proceed to step 5 below.
- Once you click on the blue button for Schedule after you ensure all Zoom settings are correct, you will receive a copy of an invitation. You can copy and paste part or all of this invitation into your Blackboard announcements, a Blackboard content area, or into an email to all your students.
Manage Participants
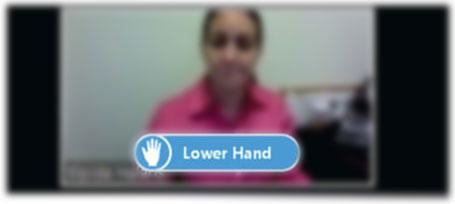
You will be able to lower the hands of your participants when they raise their hands. When a participant raises a hand, the instructor/presenter will see the option to lower the student hand as shown below. Click on the blue button labeled Lower Hand.
Share Your Screen
You will be able to share your screen with your virtual participants.
- Click on the Share Screen option in the toolbar at the bottom of your Zoom meeting application window.
- Choose an application from your desktop that you want to share.
- Once you click on the application you wish to share, click the Share Screen button. Your application/screen will be shared.
- When you are done sharing your application with your virtual students, select the Stop Share option located at the top of your screen.
End a Meeting
- Click on the option to End Meeting in the toolbar at the bottom of your Zoom meeting application window.
- Go to Iona.zoom.us and log into your Zoom account
- On the left side of the screen click on Settings under your personal profile
- Your personal Meeting settings will show in the middle of the page
- Scroll down to the Sound notification when someone joins or leaves options
- Slide the button on the bar to the left of Sound notification when someone joins or leaves. It will go from being a blue color to a gray color
- This option has now been disabled
Lecture capture is the process of recording a classroom presentation or lecture via audio and video into a video file and making that video available to students so they have the flexibility to review the lecture at any time from any location. Although the software can be used for videoconferencing, you do not need to invite participants to your lecture capture session. This document discusses the ways in which you can capture audio, video, and/or software applications open on your desktop, which does not require remote users.
The basic steps involved in recording a lecture and making it available to students involve: preparing your lecture, utilizing the software and hardware needed to record your lecture and sharing your screen with your students, recording your lecture, retrieving the saved file of your video once the lecture is complete, and, if you are using the free Zoom account and can only save a local recording, registering for a Gmail account (if you don’t already have one), uploading your video to YouTube and sharing the link to the YouTube video on your Blackboard course site. If you have a pro account, you can save your Zoom video to the cloud and share the link natively from Zoom but please note that the recordings sit on the Zoom server for 30 days. If you wish to preserve your recordings for more than 30 days, you need to download the recording to your local computer, save it to OneDrive and share it on YouTube.
Please see Faculty Services in Ryan Library if you need assistance preparing a script and presentation for a recorded lecture. Please plan for brief, 12-15 minute lectures. You can upload multiple lectures in increments.
Step 1. Sign Up for Zoom
- Navigate to zoom.us/signup.
- Enter your Iona email address.
- Once you click on the blue button to “Sign Up” you will receive the following message: Click the confirmation link in that email to begin using Zoom.
- Check your Iona email for a message from Zoom to activate your account.
- Once you click on the “Activate Account” button in your email, you will be taken to a form where you enter your first name, last name, and a password.
You are now ready to start using Zoom for lecture capture.
Step 2. Start Zoom
- Navigate to www.zoom.us.
- Click on the link to Sign In on the upper right hand navigation bar.
- Once you sign in successfully, you can either Host a Meeting with Video On or Share Screen Only.
- If you do not want to be on camera and only wish to share applications such as a PowerPoint presentation with your students, select Share Screen Only.
- A small Zoom file will unpack for you. Please follow the on-screen prompts.
Step 3. Configure the Software
- Once Zoom loads, you will be asked to check your audio – test your speakers and your microphone and troubleshoot if you cannot hear either your speakers or the mic
- Once your sound equipment has been tested, select the option to Join with Computer Audio.
- The last step for set-up is to select the Record button located on the bottom navigation bar of the Zoom software.
Step 4. Start Your Lecture and Share Your Screen
- It is a good idea to open up any web pages and applications you will be sharing during your session and minimize them in the task bar prior to starting up your session.
- You can share Microsoft Office files and other applications on your hard drive.
- When you are ready to share your screen, click on the button to Share Screen on the bottom navigation bar of the Zoom software.
- Once you select to share your screen, you will be given a list of program files that are open on your desktop from which to choose – select the program you wish to share.
- The application that you are sharing will have a green border around it.
- You will notice a top navigation bar appear with several options once of which is to stop sharing your screen.
- The Share Screen navigation bar also offers the option for you to annotate the content on your screen.
- When you are ready to stop sharing your screen, click the red Stop Share button at the top of your Zoom application window.
Step 5. End Your Meeting and Retrieve Your Local Recording
- When you have completed your lecture and are ready to end your meeting, navigate to the red End Meeting button located in the lower right-hand corner of your Zoom session – alternatively, if you have only selected the Screen Share feature, your session will end when you stop sharing your screen.
- When you end your meeting, your recording will render at that time and convert to an MP4 file that can be shared online.
- You will be shown a file directory and the location of your Zoom recording:
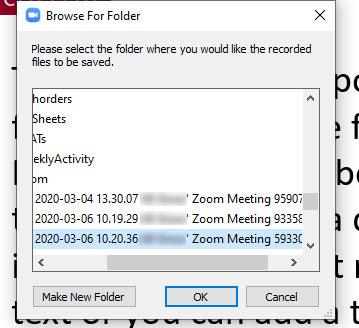
- You can locate the file from the directory or create a new folder for your Zoom recording – you can also upload the file to your OneDrive account.
- The default name for the MP4 file is Zoom_0 – please change the file name.
- It is the MP4 file that you need to upload to YouTube to make it available online – you cannot upload directly to Blackboard.
Recording to the Cloud
If you have a Zoom Pro license, you can record and save your recording to the cloud. One of the benefits of recording your lecture to the cloud is that you can see the analytics of how many times your file was viewed. If you would like to enable cloud recording and you have a pro account, please follow the steps below:
- Log into your Zoom account at www.zoom.us.
- Navigate to Settings on the left hand navigation bar.
- In the settings, you will see three tabs labeled Meeting, Recording and Telephone – navigate to the Recording tab.
- Enable the ability to allow hosts to record and save meetings to the cloud.
- Once you enable this cloud recording setting, you will see the option to Record to the Cloud in your Zoom software.
- When you end your session, the recording will automatically save to the cloud – log back into zoom.us, navigate to Recordings on the left hand navigation bar in your Zoom account.
- Click on the name of the recording you wish to share.
- There are 2 options: Download or Copy Shareable Link.
- The shareable link will only be available for 30 days on the Zoom cloud server - use the Shareable Link ONLY if you plan to share your lecture in Blackboard for a maximum of 30 days.
- Download your cloud recording within 30 days to your computer as an MP4 file, save it to OneDrive to preserve the file, and follow the instructions to upload to YouTube.
Making Your Lecture Capture File Accessible Online
Video files that need to be posted online to Blackboard must be uploaded to YouTube first. They must be downloaded to your computer. The instructor needs a free, personal Gmail account in order to upload files to YouTube. Please note that videos cannot be uploaded directly to the Blackboard server. The server will not prevent the upload of videos, but the user will quickly reach their file quotas and no longer be able to upload content to their Blackboard course site. Please use YouTube as the video storage site or use the Zoom cloud server if the video only needs to be posted for 30 days.
Verify Your YouTube Account for Videos Longer than 15 Minutes
By default, YouTube allows you to upload videos that are 15 minutes long. If you would like to upload videos longer than 15 minutes, you need to verify your account with Google.
- On a computer, go to youtube.com/verify.
- Follow the steps to verify your Google Account. You can choose to get a verification code through a text message or an automated voice call.
Step 1 Log Into YouTube and Upload Video
- Navigate to www.youtube.com.
- Use the link in the upper right-hand corner of the screen to sign in with your Gmail credentials.
- In the upper right-hand corner, you will see an icon of a video camera – click on that icon.
- Select the option to Upload Video.
- Browse to your Zoom file in MP4 format.
- The video will begin to upload and you will be asked to complete some basic information about your video such as a title and description.
- You will also be asked to set the Visibility of the video – the default is Public – please drop the option bar down and select Unlisted as an unlisted video will allow those with a link to view the video but it won’t be searchable in YouTube’s public directory.
- Allow the video time to upload and process.
- Once your video is done processing, you will be able to view the video.
Step 2. Share the Link from YouTube and Post It on Blackboard
- Once you view the video in YouTube, click on the Share button on the right-hand side underneath the video.
- A link will be generated – copy that link.
- Log into your Blackboard course site.
- Navigate to the content area (left-hand navigation links) that you want to click on to post your video to.
- Select Build Content.
- Select Web Link.
- Add a Title to the Name field.
- Paste the URL of the YouTube video in the URL field.
- Hit Submit.
Videos and Sound
Sharing YouTube videos in a mixed mode environment requires a change to the sound settings on your computer. This requirement is necessary so that your students in the physical classroom can hear the video and not just your students at home.
In order for your students in the classroom to hear the video, the sound settings on the Windows PC must be changed to the OWL speakers and the volume, which is muted by default, must be increased.
Step 1: Right click on the speaker icon located on the lower right-hand side of the screen in the task bar.
Step 2: Open Sound settings.
Step 3: Click on the Echo Canceling Speakerphone (Meeting Owl Pro) to switch the sound source from the EPSON projector to the Owl camera.
Step 4: Increase the master volume.
Please note that your students at home will be able to hear the YouTube video through the OWL speakers. This is set up by default and no change needs to be made for your students at home to hear the video.
At the Zoom Help Center users can find support for their individual platform (Mac, Linux, Windows, Android, or iOS). Support includes how-to articles on features of Zoom such as testing audio, troubleshooting video and browser-based errors, and signing in and joining a meeting.
Also at the Zoom Help Center are Frequently Asked Questions that serve as first-line support for inquiries.
Updated Training Resources Provided by Zoom
- How to download Zoom applications and join a Zoom meeting
- How to schedule a meeting and send out invitations
- In-meeting controls and differentiation tools (including the waiting room, share screen, breakout rooms)
Zoom provides AI-powered live transcription for all paid accounts. This can be enabled by the host, and any participants can view the captioning as needed. Live transcription only supports English.
Enabling closed captioning
- Log into Zoom at iona.zoom.us
- Click on Settings on the left-hand side of the screen
- On the left side of the screen click on In Meeting (Advanced)
- Look for the Closed Captioning heading
- Toggle to On
- Make sure "enable live transcription service to show transcript on the side panel in-meeting" is checked off
Starting AI-Powered Transcription
- Start a meeting as the host
- On the lower Zoom toolbar, select CC Live Transcript
- Once you select the CC Live Transcript option, a pop-up menu will appear for you
- Select the bottom option: Enable Auto Transcription
- Closed captioning will now appear at the bottom of the screen as participants are speaking
View a Copy of the Transcript
As a participant in the meeting, you can view the full transcript as well as save it for future reference
- In the Zoom toolbar, navigate to CC Live Transcript and click on the Up Arrow
- From the menu items select, View Full Transcript
- There is an option at the bottom of the window to Save Transcript