


How to Create an Event in 25Live
These instructions will help you plan a successful event and make sure people know about it. See the "Advertising Your Event" section for more tips on getting the word out about your event!
Enter a New Event/Space Request
To enter a new room/event reservation, click the Event Form located at the top-right.
The Event Form will walk you through entering your requests information step-by-step. Required fields will show as 'Required' directly after the field name. At the top of the Event Form, you'll be presented with some immediate information to note, specifically that your reservation request must be a week in advance of today's date. Let’s walk through each of the fields.
- Event Name
The Event Name field only accepts 40 characters and it is required. Be as descriptive as you can and be sure the information posted in this space is a full sentence or phrase. Do not include any special characters such as right curly quotes, etc. - Event Title
The Event Title field is optional and should only be used when the Event Name field doesn't give you enough room to present the full name for your event. If you enter information into this field, it will replace what you see as the event name on our calendar pages. Keep in mind that the previous Event Name field is required and, depending on the calendar page/feed a user is viewing, could still show up on the calendar detail pages. - Event Type
Choose an Event Type that most closely matches your event. If there isn't one on the list that's close, choose 'Other.' - Primary Organization for this Event
25Live requires that you choose a primary organization associated with this event. You can find the list of departments in the system by searching for a keyword.
Note: When conducting a search in 25Live, remember that "less is more." Keep your phrase as short as possible, and don't include any spaces if you can avoid them. This will help ensure the system brings back results and will also prevent the scenario where your phrase may be too detailed returning no results. - Additional Organization(s) for this Event [Co-Sponsors, for example]
This is an optional field, and unlike the primary organization field, you can add as many to the list as you need. - Event Head Count
This is a required field. This information is important for the space owners to ensure the space you are requesting will accommodate the number of people you expect to attend. - Event Description
The Event Description field is where you would include the body text for your event. This is now a required field. If you are planning to have this event appear on one or more of our custom calendars, include as much detail as possible in this space. This information appears when users look to get more information on your event. - Event Date and Time
Enter the time for your event as you would like the public to see it (2-3 p.m., for example). However, keep in mind that if resources are required, you’ll need to add additional time in the "Pre-Event" section to allow for set-up of tables, chairs, catering, etc. A similar amount of time should be added "Post-Event" to allow for breakdown of resources, particularly since another event may be scheduled after yours. Only the actual event time will display on public calendars, not pre or post times. The "Pre-Event" and "Post-Event" fields are found under the 'Additional Time' block on the form.
Note: Events need to begin and end on the same day. All spaces have open/close times that will not allow for a single event entry that spans multiple days. In those situations, requests need to be entered as a repeating event. - Event Location
You can run quite a few different searches to find your space, but we'll assume for this tutorial that you know where you want your event to take place. You can search by location name by clicking on the 'Reset' link, if necessary, remembering to only use a few characters to run your search. Misspellings, incorrect punctuation etc. could potentially hide spaces from you.
Upon running your search, you'll receive real-time results based on reservations already in the system. If your space is not available, you can check for conflicts by clicking on the 'Conflict Details' link to the right of the space in question. A pop-out window will display conflict details.
Assuming your space is available, you can click on the 'Request' button on the left, which will add the request to the bottom of the Locations portion of the form. You can follow the same steps if your event is to be held in multiple locations. - Event Resources
Resources in the database are approved by the resource 'owner' and as of this tutorial, there are three owners, Facilities, Infotech, and the LaPenta Student Union (STUDUNION). Resource requests should be entered for each type of resource, including quantities. Note the general rule is that you should only request resources owned by STUDUNION if you are reserving space in the LaPenta Student Union building. Otherwise, choose resources owned by INFOTECH and/or FACILITIES.
You must enter a resource as part of your space request. If you do not require any resources, choose the option 'NO RESOURCE(S) REQUIRED' to confirm you will not require resource(s). - Event Categories
You have the ability here to choose one or multiple calendars to advertise your event. If your event is a simple room booking and you do not want it posted for the public to see, leave this section empty.
Categories prefaced with the word Calendar: and Yearly Event: perform special functions. Each of those category options corresponds to a particular custom calendar that appears on the University's website. Should your event be approved to appear on one or more of those calendars, choose the appropriate categories as necessary, but always start with Calendar: Public Master Calendar. If you would like students to attend your event, make sure you are also choosing Calendar: Student Event.
For any other calendar, please make sure to get permission from the department or office that controls it before adding it.
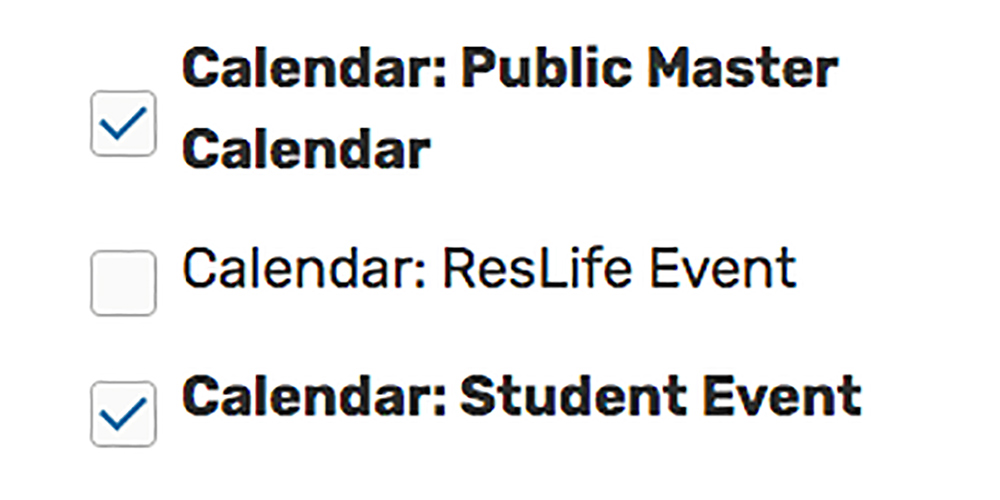
If you want to publicize your event on the Iona website, always start with the Public Master Calendar. If you would like students to attend your event, make sure you are also choosing Calendar: Student Event.
- Finish
You are done! Click on the 'SAVE' button to notify space owners and resource owners (if applicable) for approval.
You should expect a response in the system within 48 hours. as to whether your reservation has been approved or denied.
Advertising Your Event
If you would like to further publicize your event, you may want to advertise it in Campus Announcements. Jason Kattenhorn, graphics specialist in Information Technology, can make flyers if your audience is internal. You can also place ads in The Ionian, Iona's student-run newspaper.