


Video Conference Classroom
Currently there are two classrooms that have Video Conferencing equipment installed. They are in Doorley Hall 110 and Murphy Center 132.
The main components of the room are:
- Vaddio Video Camera: This is the camera which is mounted on the back wall of the classroom. This camera can be used to show the video conferencing students the classroom.
- Echo Speakers: These speakers are mounted in the ceiling in the middle of the classroom. They say Bose on them. The students who are at home can be heard through these speakers.
- Echo Microphones: There are two microphones hanging from the ceiling in the middle of the room. These allow the students at home to hear the lecture in the classroom.
- Epson Projector: The projector is mounted above the dry erase board in the front of the classroom.
- Crestron Control Panel: In the corner of the podium, there is a touch screen control panel which is used to interact with the equipment in the classroom.
On Top of Podium
The podium looks similar to the podium in most classrooms on campus. On top, there is one computer monitor in Murphy 132 and two computer monitors in Doorley 110. There is also a mouse, keyboard, and Ladibug Document Camera. In addition there is a special control panel described above.Inside the Podium
When you are standing behind the podium, facing into the classroom with the dry erase board to your back, there is a cabinet to the right side of the podium. Contained within this cabinet are several important pieces of hardware that you will need to be familiar with if you are setting up the classroom for a class. The major pieces to be aware of are:- Computer: The computer is mounted horizontally. Please take a moment to find it and specifically the power button. You will still need to use this button to turn on the computer.
- Vaddio boxes: Depending upon which classroom you are in, there will either be one or two Vaddio controller boxes. These have blue lights that should be on. If you are have trouble with the speakers and microphones in the classroom, make sure these boxes are on.
- Power strip: At the bottom there is a power strip/switch. This can be used if the system needs to be reset. If you are experiencing any issues with the system, a good thing to try is to turn this switch off, count to thirty, and turn it back on.
The sections below will discuss each piece of equipment within the classroom. If you are looking for a simple startup procedure, please see the section “Setting Up for a VC Class”. If you are trying to troubleshoot your setup, it is recommended to look at the “Troubleshooting” section first.
Equipment Control Panel
The equipment control panel is on the corner of the podium. You will be using this to control all the equipment in the room. It is a small touch display and has been designed to be simple and intuitive.
Turning the System On
When you first enter the classroom, the screen may be blank. Simply touch the screen with a finger and you will be prompted to Press Screen To Begin.
Simply use your finger again to touch the screen. This will turn on the projector, camera, microphones, and speakers. Note: If you are looking to use the computer, please open the podium cabinet and push the power button on the middle of the computer.
The screen will change to the main control screen, ready to be used:
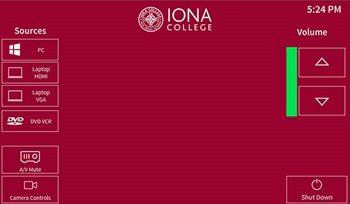
Familiarize yourself with the options on the screen. It allows you to do the following:
- Select Source: On the left hand side, the available sources, or what will be shown on the projector screen. Simply use a finger to select the button for the source you wish to use. The default is the PC in the podium.
- A/V Mute: This button can be used to temporarily hide what the projector was showing. Simply press the button to hide the display, press it again to show the display again.
- Camera Controls: This button will change the controller display to the following screen:
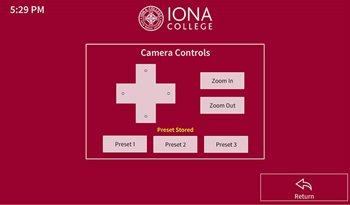
- Use the buttons on this screen to move the camera, zoom in or out, and utilize the preset views. Use the ‘Return’ button to return to the home screen.
- Volume Control: Simply press the up and down arrow buttons to adjust the volume of the system. The green bar will show you the current level.
- Shut Down: In the bottom corner, use this button to turn off all the equipment except the computer. When you press this button, it will check to make sure you want to:
If you want to shut down, simply press the ‘Yes’ button. If you changed your mind or it was an accident, press ‘No’ and you will be returned to the home screen.
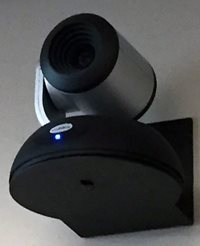
Vaddio Video Camera Located on Back Wall
Vaddio Video Camera
The video camera is on the back wall of the classroom:
Using the Camera Controls
On the control panel, use the following buttons to control the camera.
- Directional Arrow Pad: Use these arrows to move the camera up, down, right, and left. It is recommended to use a series of short taps rather than holding these buttons.
- Zoom In: This button zooms the camera in towards the front of the classroom.
- Zoom Out: This button zooms the camera for a wider view of the classroom.
- Stored Presets: These are each preprogrammed to a specific view of the classroom. Try these out to see if one will work for you.
- Return: This will bring you back to the home screen of the control panel.
Echo Cancelling Speakers/Microphone
There are two speakers that are mounted in the ceiling towards the middle of the classroom, they say Bose on them. In addition, there are also two microphones hanging from the ceiling in the center of the room. These are referred to as the ‘Echo’ speakers and microphones as that is the option you will be choosing on the computer to select them.
Echo Speakers
The echo speakers are where your VC student’s voices will come from. If you cannot hear your VC student’s at all, it is important to check that these are on and that the volume is appropriate for them.
Setting Up Echo Speakers in Zoom
In Zoom, you select which microphones and speakers are to be used for the audio coming in and out of the program. The Echo speakers should be selected as Zoom’s speaker. To confirm this is the case and to test the speakers do the following:
- Turn on the computer and log in.
- Launch Zoom from the Iona University Apps basket (which is an icon on the desktop).
- Log in to Zoom.
- Start your Zoom session with video.
- Select ‘Test Computer Audio’
Note: If you have already joined your audio, you can always check the settings, by selecting the arrow next to the microphone at the bottom of the zoom screen. From the menu that pops open, select ‘Audio Options’ and then ‘Test Computer Audio’. - In the dropdown box next to ‘Test Speaker’ make sure ‘Echo Cancelling Speakerphone’ is selected.
- Select ‘Test Speaker’ and a short piece of music should play through the Echo speakers in the back of the classroom. This confirms that the speakers are setup correctly.
- You can close the settings panel by selecting the ‘X’ in the top right hand corner.
Echo Microphones
The echo microphones are how your VC students will hear what is going on in the classroom. You want to make sure these are on and working otherwise your VC students will not be able to follow along with the class.
Setting Up Echo Microphones in Zoom
In Zoom, you select which microphones and speakers are to be used for the audio coming in and out of the program. The Echo microphones should be selected as Zoom’s microphone. To confirm this is the case and to test the speakers do the following:
- Turn on the computer and log in.
- Launch Zoom from the Iona University Apps basket (icon on the desktop).
- Log in to Zoom.
- Start your Zoom session.
- Select ‘Test Computer Audio’
Note: If you have already joined your audio, you can always check the settings, by selecting the arrow next to the microphone at the bottom of the zoom screen. From the menu that pops open, select ‘Audio Options’ and then ‘Test Computer Audio’. - In the dropdown box next to ‘Test Mic’ make sure ‘Echo Cancelling Speakerphone’ is selected.
- Select ‘Test Mic’. It will record what it hears in the classroom, say something clearly into the microphones, i.e. Test, Test, Test. When you have finished saying something, click on the ‘Recording’ button and it will play back the recording. If you hear yourself, then the microphones are setup correctly.
- You can close the settings panel by selecting the ‘X’ in the top right hand corner.
Epson Projector
The Epson projector is in the front of the classroom, above the dry erase board. The projector functions similar to other projector setups around campus. It will display what is shown on the screen of the computer at the podium. This will turn on when you press the Control Panel to begin. It will turn off when you select the Shut Down button on the Control Panel as well.
Multi-Monitor Computer
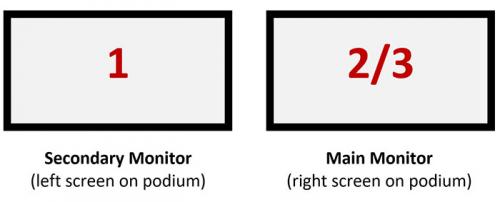
The computer in Doorley 110 is set up to use three monitors. They are:
- The main monitor (to the left when facing the back of the classroom) on the podium.
- The secondary monitor (to the right when facing the back of the classroom) on the podium.
- The projector which mirrors what is shown on the main monitor.
Navigating
The monitors have been set up so that the computer will mimic behavior based on where the monitors are geographically in the classroom. In other words, when moving the mouse across the screens, the back TV is considered to the left of the main monitor which is considered to the left of the secondary monitor on the podium. You should be able to move the mouse and drag programs across the screens in this way. See the diagram below for a visual of this layout:
Short Cuts
There is a short cut to help move application windows between the different monitors. This can be useful so that you don’t need to physically drag the windows across the monitors. To use this short cut, do the following:
- Select the window of the application you would like to move.
- Hold down the windows key and at the same time select the left or right arrow to move it in the appropriate direction.
- Repeat hitting the left/right arrow until the application is where you would like it to appear.
Presenting in PowerPoint
Since there are three monitors (in Doorley 110), PowerPoint will allow you several options while presenting. It is recommended to utilize ‘Presenter View’ which can be selected on the ‘Slide Show’ menu on the top menu in PowerPoint.
This section is designed to walk you step by step in order to setup the classroom to be ready for video conferencing. There are a few assumptions being made for this process. The main one is that you are walking into the classroom and everything is off. Another assumption is that you are utilizing this classroom as a VC class and need to turn all of the systems on. The last assumption, is that you are familiar with all of the equipment, if you are unsure of how to turn something on, refer to the earlier section on that device.
1. Enter the Classroom and Assess
When you walk into the classroom, the first thing you will want to do is asses the room. Walk over to the podium and look around the room. Take note of a few things:
- Is the camera in the back of the room off (facing to the side)?
- Is the projector on?
- Look to your right, in the cabinet under the podium, are the blue lights on the Vaddio boxes on?
2. Turn on Equipment
The first thing to do, is start turning everything on. Some things take a few moments to boot up, so it is a good idea to turn everything on now, so that when you need them later they are ready for you. Make sure you do the following:
- Make sure the Vaddio boxes in the cabinet of the podium have blue lights on. If they do not, check the power strip and turn it on.
- Turn on the computer.
- Touch the Control Panel (Crestron) to begin.
3. Launch Zoom
Once the computer is on and you have logged in, it is time to setup your Zoom session.
- Double click on the Iona University Apps icon on the desktop and select Zoom from the list of apps.
- Log in to Zoom.
- Select ‘Start with video’ to start a new Zoom session.
- Test your audio every Zoom session. Do this by selecting ‘Test Computer Audio’ underneath the ‘Join Audio by Computer’ button.
- Make sure the ‘Echo’ speakers and microphone are selected in the dropdown boxes.
- Hit ‘Test Speaker’, a piece of music should play out of the speakers in the back of the classroom.
- Hit ‘Test Mic’, speak clearly into the microphones to record a short test. The test will play itself out of the speakers in the back of the room.
- Close the audio options by selecting the ‘X’ in the top right hand corner.
- Select the ‘Join Audio by Computer’ button.
- Invite your VC students by selecting the ‘Invite’ button at the bottom of the Zoom window.
- Select ‘Copy URL’ in the bottom left hand corner.
- Paste this url into an email and send it to your VC students so they can join the class.
4. Set Your “Stuff” Up
Now that all the equipment is on and your Zoom session is setup, open anything you may need for class. i.e. PowerPoints, web pages, videos, etc.
Depending on what you are doing, you may want to adjust the camera to be focused on the best part of the classroom for your lesson.
If you need more assistance, or have questions regarding using Zoom specifically. Please visit this documentation for assistance.
As with any technology, things will not always work. Below are some of the common questions received and ways to try and troubleshoot them.
The students say they cannot hear anything from the classroom.
This problem usually has two causes. Either the microphones in the classroom are not on, or they are not selected in Zoom.
- Are the microphones on?
Look in the podium cabinet to make sure the blue lights on the Vaddio boxes are on. If they are not, check the power strip and turn it on. - Do you see ‘Echo Cancelling Speakerphone’ as an audio option?
Check the sound on the desktop as well as in Zoom settings. If there is not option for ‘Echo Cancelling Speakerphone’ you will need to restart the Vaddio boxes. To do this, turn the power strip off, count to 30 and then turn it back on. Once the Vaddio boxes have finished booting up, make sure you turn the camera back on, if it is not. This process has reset the Vaddio camera, echo microphones, and echo speakers. The students should be able to hear you. - Is Zoom set correctly?
In your Zoom session, go to audio settings and make sure the dropdown box for microphones has the ‘Echo Cancelling Speakerphone’ selected. Test the speakers and microphones again. - It may be a student problem.
Always be aware that it could be that all of the equipment is working fine in the classroom and that the student is having an issue. If you think this is the case, direct the student to support.zoom.us and have them use the documentation or chat service(in the bottom right hand corner) to try and solve their problem.
The students say they cannot see anything from the classroom.
- Is the video camera on?
Look in the back of the room, is the camera facing you with a light on? If it is not, make sure the power strip is on. - Are you sharing your screen in zoom still?
If you have shared your screen with the students on Zoom, they will not see what the video camera is seeing. Stop sharing, by selecting ‘Stop Share’ in the red box in the middle at the top of the computer screen. Zoom, should return to showing the camera feed. - Is the right camera selected in Zoom?
If a different video camera has been used instead of the Vaddio Video Camera, Zoom may still be using it. To check this, go to the video settings by selecting the up arrow next to the video camera icon on the bottom of the Zoom window. Then select ‘Video Settings’. I the drop down box at the top, make sure ‘AV Bridge Matrix Pro’ is selected. - Do you see ‘AV Bridge Matrix Pro’ as a video option?
In the Zoom video settings, if there is not option for ‘AV Bridge Matrix Pro’ you will need to restart the Vaddio boxes. To do this, turn the power strip off, count to 30 and then turn it back on. This process has reset the Vaddio camera, echo microphones, and echo speakers. The students should be able to see you. - It may be a student problem.
Always be aware that it could be that all of the equipment is working fine in the classroom and that the student is having an issue. If you think this is the case, direct the student to support.zoom.us and have them use the documentation or chat service(in the bottom right hand corner) to try and solve their problem.
The video/sound I am playing on the computer is not working.
- Is the computer muted?
Look in the bottom right hand corner of the computer screen. Click on the volume/speaker icon and make sure it is not muted and that the volume level is raised.
The image being displayed in Zoom seems backwards.
Zoom has a feature which applies a mirror effect to the video feed. This can be useful depending on what you are displaying. If you want to change this setting do the following:
- Go to the video settings menu (Select the up arrow next to the video camera icon at the bottom of the Zoom window, select ‘Video Settings’).
- A modal window will open. The first checkbox under the preview image says, “Enable mirror effect for my video.” Use the checkbox to turn the effect on or off. You will see a preview of the feed in the image above the checkboxes if you are unsure which selection is best.
The students are having problems that I don’t know how to solve.
If the students at home are having issues that are unrelated to your setup in the classroom, i.e. only one student can’t hear, the others all say everything is fine, direct them to Zoom’s support. There are far too many variables for you to be troubleshooting remotely. Zoom has extension support resources as well as live chat support which can be found in the bottom right corner of the webpage. Direct the students to:https://support.zoom.us